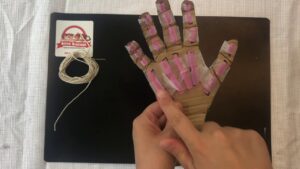
Biomechanical Hands
- Build Idea!: When the hand is complete, it should be able to pick up a ball of tissue paper and “throw” it across the room!
Do you think it’s easy to make a robot that can walk and function like a human? No! Our bodies are complicated machines and it even takes us humans quite a while to figure out how to use our bodies. Think about babies. When a baby is first born they can’t hold their heads up, walk, or talk! So building and teaching a machine to move or act like a human is really complicated. The field of study that investigates how our bodies (actually all living organisms) work is called biomechanics. By studying biomechanics, scientists can use their knowledge of the body to tackle problems around us.
But why would you want to make a robot like a human? Any ideas? What about disaster relief? Car crash testing? manufacturing safety? Really any situation where it might be dangerous for humans to venture, but you still need human-like skill and movement in order to perform the task.
In this project we are going to act like biomechanical engineers by examining one part of the body – the hand – and how it moves! Then we are going to engineer our own “robotic” hands that will actually be able to pick things up!
Watch The Video
https://youtu.be/NXqNxHXMeqE
Required Materials
- cardboard
- string
- pen, pencil, or other writing tools
- straws
- permanent marker
- scissors
- tape
Step-By-Step Instructions
Step 1
Trace the outline of your entire hand onto the cardboard with the pencil and be sure to include some of your wrist.
Step 2
Mark the placement of the bones and joints that bend on each finger. Bend the cardboard along the lines of each finger joint.
Step 3
Measure the straws against the finger bones you’ve marked. Mark the straws and cut three pieces for each set of your four finger bones (12 total). Then measure and cut two pieces for the thumb. Note: all these finger bones are called phalanges! Now measure, mark and cut five slightly larger pieces for the bones in your hand (metacarpals). Make sure there is plenty of room for the joints (the folds between the pieces of straw) to bend; the straws should not touch.
Step 4
Use your scissors to cut out your cardboard hand along the lines you traced.
Step 5
Attach the straw tubes to the cardboard where you marked the placement of your bones. Be sure to leave the bended joints “open”.
Step 6
Attach a piece of string to the top of each finger with tape and thread it down through the corresponding straws – aka phalanges and metacarpals – and down past the wrists. Leave about 2 inches of string hanging past the cardboard in order to move your robotic hand!