
Math concepts show up everywhere in the world around us, and we hope you enjoy learning about it as much as we do. In this STEM lesson plan for elementary schoolers you’ll learn about the Fibonacci sequence, discover the story of the engineer Raye Montague, and engineer a robotic blooming flower.
Resources in This Lesson
Resource 1
Learn about the Fibonacci sequence with this fun exercise. You’ll discover how to calculate this mathematical sequence and where it shows up in nature!
Rosie Explores the Fibonacci Sequence
https://handsonstem.rosieriveters.com/resources/rosie-explores-fibonacci-sequence/
Resource 2
For our book we’re reading The Girl with a Mind for Math. This book shares the story of the amazing engineer Raye Montague, and the obstacles she faced to become the first person to design a ship on a computer.
Rosie Reads The Girl With a Mind for Math
https://handsonstem.rosieriveters.com/?post_type=rr_resource&p=3025
Resource 3
Put your math and engineering skills into action! For this project we’re using the Fibonacci sequence to design and construct a robotic blooming flower.
Rosie Makes Robotic Blooming Flowers
https://handsonstem.rosieriveters.com/resources/rosie-makes-robotic-blooming-flowers/
Resource 4
Continue learning and exploring with some of these tried and tested Rosie Recommends activities from other STEM educational resources.
Rosie Recommends Math Activities!
https://handsonstem.rosieriveters.com/resources/rosie-recommends-math-activities/

Check out these tried and tested math activities from other STEM educational resources!
Recommended Resources
Resource 1
Fibonacci Art Project
Can’t get enough of the Fibonacci sequence? We can’t either and love this project that combines the Fibonacci sequence and art! The numbers in the sequence become the radii of circles you’ll use to create your art work, and given the emphasis on circles, you can bring everything together to explore the relationship between the radius, diameter, and circumference of a circle and pi.
Resource 2
NASA Space Math Resource
If you’re looking to explore math and space, look no further than NASA’s free space math resource! The content covers basic arithmetic to calculus and can be sorted by grade level, NASA mission, space topic, or national learning standard. Given the amount covered, you’ll want to look over the activities and answer keys before handing them over to your kids. Some of our favorites – all of which fall into the 3rd-5th grade level – are the Space Science Crossword and the Solar Storm Number Puzzle!
Resource 3
Monster Math Game
Math can also be super fun with little ones and this awesome Monster Math game from Adventure in a Box proves it! Kids draw monster body parts based on the number they role on a dice so it’s a great counting and early addition activity.
A flower is like a little plant that has special parts that help it grow and make seeds. When the flower gets enough sun, water, and food from the soil, it starts to grow and stretch. And just like you might stretch your arms to reach for a toy, the flower stretches its petals to open up and show off its colorful parts.
A flower is made up of several parts that help it grow! The main parts of the flower are:
- Petals: These are the colorful parts of the flower that attract pollinators like bees and butterflies.
- Stamens: The parts of the flower that produce pollen.
- Pistil: The parts of the flower that receives the pollen and produces seeds.
- Sepals: These are the small leaves at the base of the flower that protect the flower before it blooms.
To bloom, a flower needs sunlight, water, and nutrients from the soil. Once it has enough of these things, it will grow and its petals will open. When the stamens release pollen, it can be carried by pollinators to the pistil, where it will fertilize the plant and help it make seeds. This is how the continues to grow.
So, that’s how flowers bloom – they stretch and open up to show off their special parts and make new plants!
Ready to make this project at home or in your classroom? Watch the video for an overview, gather the materials listed to the right, and follow the instructions below!
Watch The Video
https://youtu.be/tuB6kIfJaGk
Required Materials
- foam hearts
- string
- 2 straws
- scissors
- tape
- chop stick
- pen, pencil, or other writing tools
Step-By-Step Instructions
Step 1
Cut the straw into three equal pieces.
Step 2
Tape one section of the straw to the bottom of the foam petal, and repeat for the other two petals (the straws should be taped parallel to the flower.)
Step 3
Take 1 piece of string and tape it to the top of the petal, opposite the side with the straw. After it’s secure, thread the string through the straw.
Step 4
Attach the other two strings, in the same way, on the other petals, and thread them through the two straws.
Step 5
Cut the 3M foam square in half.
Step 6
Remove one side of the adhesive and wrap the foam around the dowel, about two finger spaces from the top.
Step 7
Remove the other side of the adhesive from the sticky foam square and attach the three foam petals around the dowel, one by one, and press to secure with the straws facing outwards.
Step 8
You may add extra tape around the base of the petals to reinforce.
Step 9
Pull the bottom of the strings gently to make your flower bloom!
Optional Classroom Activities
Resource 1
FLOWER DISSECTION: Dive into the inner workings of flowers with your students! Equip each student with a real flower, like a lily or rose, and guide them through the dissection process. Encourage careful examination and identification of parts like petals, sepals, stamens, pistils, and ovary. Prompt students to observe the functions of each part, such as petals attracting pollinators or stamens producing pollen. This hands-on exploration not only deepens understanding of plant anatomy but also sparks curiosity and engagement in botany. For a helpful resource, consider using this dissection sheet outlining steps and structures to observe during the activity. Get ready for an exciting journey into the world of flowers with your students!
Resource 2
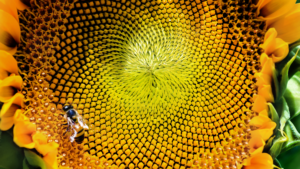
Math is full of patterns – sequences of numbers. One cool pattern in math is known as the Fibonacci sequence. This pattern shows up everywhere in nature from flowers to galaxies. It’s sometimes called the golden spiral or golden ratio. To make the Fibonacci sequence you have to take the sum of the proceeding numbers starting with 0 and 1.
It looks something like this:
0 + 1 = 1
1 + 1 = 2
1 + 2 = 3
2 + 3 = 5
This pattern goes on forever as long as you continue to add the sum of the two proceeding numbers.
How does this pattern make the spiral we associate with the Fibonacci sequence? We can figure it out now with the project below!
Want to duplicate this experiment at home or in your classroom? Watch the video for an overview, gather the materials listed to the right, and follow the instructions below.
Watch The Video
https://youtu.be/ZEev-00cB7E
Required Materials
- paper
- ruler
- pen, pencil, or other writing tools
Step-By-Step Instructions
Step 1
Using a ruler, draw two equal squares 1 inch x 1 inch touching each other. This will be the start of our Fibonacci sequence!
Step 2
Remember that the previous two numbers equal our next value. This means we need to draw a 2 inch x 2 inch square right on top.
Step 3
Our next value is 3, because 1 + 2 = 3. This means we need to draw a 3 inch x 3 inch box next to our previous boxes. We’ll be drawing each new box in a counter-clockwise direction.
Step 4
Can you guess the next box? That’s right 3 + 2 = 5, so our next box will be 5 inches x 5 inches.
Step 5
Now on to the last square. We’ll be drawing out 8 inches x 8 inches. Any idea how we got there? You should finish with a giant rectangle of the Fibonacci sequence.