Grown Up Guides – A
 Grade
Grade The mantra we repeat in our programs is “I may not know, but I know I can figure it out.” Our projects are designed to foster the same “we can do it” attitude, and we encourage you to share this message with your children at home.
3rd-5th Grade Projects
Resource 1
Lava Lamps
Below are some key terms and definitions we covered today regarding chemical reactions.
Physical Change: In a physical change there can be a difference in the appearance, smell, or simple display of a sample of matter without a change in composition. We explored this by folding paper (origami balloons) to observe that although the paper looked different it was still paper.
Chemical Change: In a chemical change a new substance is formed and energy is either given off or absorbed. We explored chemical changes by creating erupting lemons. We pushed baking soda into a lemon and watched it bubble and fizz. What is actually happening: the citric acid from the lemon juice is reacting to the base of the baking soda creating a gas called carbon dioxide.
Chemical Reaction: Don’t be alarmed if your kids start waving their hands around when you ask them what a chemical reaction is. We used our hands to remember that a chemical reaction is when we mix two different things together to make something new.
Here is a questions to ask your child about density:
Q: How do I tell if something has more molecules than something else? What is that called?
A: Weight (or mass) and density are proportional when objects are the same size because the more molecules, the heavier an object will be. So we can identify if something is denser (measure density) than something else by its weight (or mass).
Check out our Rosie Explores activity below to learn more!
Rosie Explores Chemical and Physical Change
https://handsonstem.rosieriveters.com/resources/rosie-explores-chemical-and-physical-change/
Resource 2
Art Bots
Here are a couple definitions, questions to get your kids talking about what they learned today, and a few additional things to note.
Definitions:
- Electrons: A stable subatomic particle with a negative charge, found in all atoms and acting as the primary carrier of electricity in solids. We had a great time “repelling” (passing an extra ball around) them in our circuit.
- Batteries: When a battery is supplying electric power, its positive end (cathode) and its negative end (anode). The end marked negative (-) is the source of electrons that, when connected to an external circuit, will flow and deliver energy to an external device like an electric motor. We worked to make sure that the positive and negative ends of our batteries were positioned properly in our circuits.
- Circuit: A circuit is a path that starts and stops at the same place. We talked a lot about circles today and how circuits have to be completely “closed” to work.
With this information in mind some, below are a few questions to ask your kids:
- What is electricity? Electricity is the flow of charge. Usually charges will be carried by free-flowing electrons. Elements with high conductivity, which have very mobile electrons, are called conductors. These are the types of materials we want to use to make wires and other components which aid in electron flow. Metals like copper, silver, and gold are usually our top choices for good conductors.
- What three things are required to create an electric circuit that makes their Art Bot run? An energy source (battery), a path (wire), and a motor.
- What would happen if one of the legs of the wires were to come loose from the circuit? The circuit would be open and the flow of electrons would stop moving through the circuit, meaning the motor would not run.
A couple of things to note:
- If any part of the circuit becomes loose, the connection may become incomplete and the Art Bot will not turn on. The points of connection to check are:
- Where the wires connect to the base of the motor.
- Where the motor wires and the battery pack wires are connected.
- As the motors on the Art Bots are constantly moving things can become loose and/or disconnected. If the art bot stops working the first places to check are the connection points outlined above.
Check out our Rosie Explores activity below to learn more!
Private: Rosie Explores Electricity
https://handsonstem.rosieriveters.com/?post_type=rr_resource&p=1090
Resource 3
Metamorphosis Caterpillar Fans
Today we learned about metamorphosis, how DNA research is helping scientists understand patterns on butterfly wings, and about monarch butterfly migration.
We learned that insects are not the only creatures that go through metamorphosis and we also learned about the different stages of metamorphosis by playing go bug!
After learning some amazing facts about butterflies we built our own Metamorphosis Caterpillar Fans!
Some questions to ask your child about what they learned today:
- What are the four stages of a butterfly’s metamorphosis? (egg, larva, pupa, adult)
- How many miles do monarch butterflies migrate? (3,000!)
Check out our Rosie Explores activity below to learn more!
Rosie Explores Butterflies and Metamorphosis
https://handsonstem.rosieriveters.com/resources/rosie-explores-butterflies-and-metamorphosis/
Resource 4
Artificial Lungs
Explore your child’s project and pull on the balloon at the bottom. What happens? The balloon inside the cup should inflate as you pull down and then deflate as you let go. Why? As the knotted balloon is pulled it creates more space inside the bottle. Air can then come down the straw and fill the inside balloon which now has more space. When you let go, the balloon no longer has the space that it needs so the air goes back out through the straw and the balloon deflates.
This is exactly like our lungs, where air is taken through the mouth and nose and passes into our lungs. The diaphragm at the bottom of our chest expands to create more space, pulling air into our lungs as we breathe in and then the diaphragm relaxes pushing it out again. The cut balloon represents the diaphragm and the balloon inside the container is our lungs.
Check out our Rosie Explores activity below to learn more!
Rosie Explores the Lungs
https://handsonstem.rosieriveters.com/resources/rosie-explores-the-lungs/
Resource 5
Film Canister Rockets
Today we explored the concepts of potential and kinetic energy by creating Film Canister Rockets. We had a great time exploring these fundamental physics principles in a hands-on and interactive way.
Potential energy is the stored energy in an object due to its position or state, while kinetic energy is the energy of an object in motion. As we launched our rockets, we were able to see how the potential energy stored in compressed air converted into kinetic energy in the form of motion.
Here are a few questions that you can ask your child to continue their learning at home:
- What is potential energy?
- What is kinetic energy?
- How did the compressed air in the bottle become kinetic energy?
- Can you think of any other examples of potential and kinetic energy in our daily life?
Check out our Rosie Explores activity below to learn more!
Rosie Explores Potential and Kinetic Energy
https://handsonstem.rosieriveters.com/resources/rosie-explores-potential-vs-kinetic-energy/

Energy is the potential for something to do work, and we’re exploring the differences between potential and kinetic energy!
Potential energy is the energy stored in an object due to its position while kinetic energy is the energy an object possesses due to motion. We’re doing two experiments – one with a rubber band, the other with a balloon – to investigate!
Want to duplicate them at home or in your classroom? Watch the video for an overview, gather the materials listed at the right, and follow the instructions below!
Watch The Video
https://youtu.be/UOzDlPXzQWw
Required Materials
- balloon
- ruler
- rubber band
Step-By-Step Instructions
Step 1
To explore potential energy, hold a ruler so that the side marked with inches is facing away from you. Stretch a rubber band over the corner of the ruler to the one-inch mark. Make sure there is no one around you that you could accidentally hit with the rubber band, then release the rubber band. Next, measure how far the rubber band traveled.
Repeat steps one through four, this time stretching the rubber band back to the four-inch mark. Remember to make sure no one is around you! Note how much farther this rubber band went compared to the first time as it had more potential energy given its position further back along the ruler!
Step 2
To explore kinetic energy, blow up a balloon. Don’t tie it! Instead, let it go so it can fly! When filled with air, the balloon has potential energy – the stretched rubber of the balloon itself and the air inside it. When the air is released, the potential energy is converted to kinetic energy as the balloon deflates and zooms around the room!
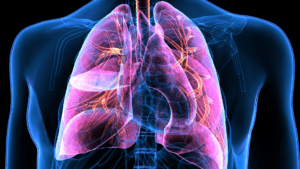
Place the palms of your hands on your stomach and take in a big deep breath (inhale). Then let the breath out (exhale). What did you notice? Did your stomach get bigger as you inhaled? Did it get smaller as you exhaled? The average adult breathes in and out (inhales and exhales) 17,000-30,000 times a day! A big reason we are able to take this many breaths is because of a powerful muscle called the diaphragm.
Below your lungs, connected to your ribcage, is your diaphragm. Your diaphragm is a muscle that expands and contracts (gets bigger and smaller) to help you breathe in and out.
Your lungs function somewhat like a vacuum. A vacuum is a space with little or no matter, including air! Because there is very little in the space, the space inside a vacuum has very low-pressure. A partial vacuum, like your lungs, will always have just a little bit of air. (Theoretically, a true vacuum will contain no matter, or air whatsoever. ) The higher-pressure of air surrounding the lower-pressure vacuum, combined with the mechanism of your diaphragm, helps move air in and out of your lungs.
When you inhale through your mouth and nose and the air travels through the trachea, the trachea will ultimately branch into two different parts known as the right bronchi and left bronchi. Each bronchus (singular) will then divide again and again, becoming narrower and narrower. Your smallest airways (bronchi) end in the small thin air sacs known as alveoli. These “balloons” are arranged in clusters. When you breathe in, the alveoli will expand like balloons as air rushes to fill the vacuum. When you breathe out, the “balloons” will relax, moving air out of the lungs.
As you breathe in, the alveoli will expand like balloons as air rushes to fill the vacuum. When you breathe out, the “balloons” will relax, moving air out of the lungs. At the same time that these balloons fill, your diaphragm pulls down helps create more space for air to flow into your body. Then as you breathe out, your diaphragm relaxes after all its hard work and the smaller space pushes air back out of your body.
Want to duplicate this experiment at home or in your classroom? Watch the video for an overview and follow the instructions below!
Watch The Video
https://youtu.be/LTcET7H8NSw
Step-By-Step Instructions
Step 1
Put your hands on your chest, and note what happens when you take deep breaths in and out.
Step 2
Run in place for ten seconds.
Step 3
Put your hands back on your ribs and feel your lungs. Note how fast you are breathing in and out!
Step 4
Put your hands together so that your fingers are intertwined. This represents our diaphragm. When you flatten your hands out, this is what happens when we breathe in and the muscle expands. Keeping your hands intertwined, put your hands together so that your palms are touching. This is what happens when you breathe in and our lungs contract.
Rosie Explores Butterflies and Metamorphosis
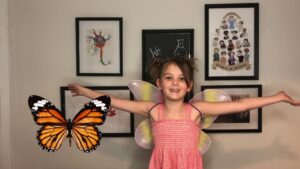
We’re diving in to all things butterflies and metamorphosis in this episode of Rosie Explores! Join Rosie Girl Veronica as she shares an overview of metamorphosis and some really amazing facts about butterflies. Did you know that they grow from the inside out? And that migrating monarch butterflies travel over 3,000 miles from Mexico to Canada?
The four stages of metamorphosis are:
- Egg
- Larva
- Pupa
- Adult
Once you’ve learned all about metamorphosis, check out a couple of fascinating videos from Kids Should See This to see it all in real time! You can watch the process of metamorphosis in detail and see the tiny butterfly wings hiding inside of caterpillars!
Watch The Video
https://youtu.be/6BIEqmpCgrE
Rosie Explores Chemical and Physical Change
- Fire is used as a part of these experiments. Please do not perform without an adult.
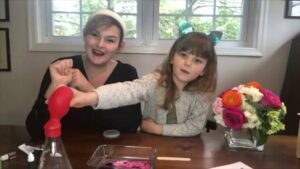
Learn the differences between chemical and physical change in this series of experiments. We’re playing with paper towels, blowing up balloons, and making all kinds of chemical reactions!
Watch The Video
https://youtu.be/7T9Edwh3dyE
Required Materials
- paper towel
- matches or lighter
- lemon (cut in half)
- glass cup
- baking soda
- food coloring
- popsicle stick
- Alka Seltzer tablet
- flask (or bottle)
- water
- 1 balloon
Step-By-Step Instructions
Step 1
Physical Change: In a physical change there can be a difference in the appearance, smell, or simple display of a sample of matter without a change in composition. To explore physical change, crumple up a piece of paper towel and observe that although the paper towel looks different, it is still a paper towel. We can reform it back into its previous state/shape and lay it flat.
Step 2
Chemical Change: In a chemical change a new substance is formed and energy is either given off or absorbed. To explore chemical change, we performed a number of experiments. First, with an adult present, crumple the paper towel back into a ball and use a lighter or match to light it on fire. Quickly drop it into a glass. Note what happens when the oxygen going into the fire is stopped by the glass. Is there a smell? Do you see smoke? After making your observations, be sure to put the fire completely out by pouring water into the glass. Use our fun hand trick from the video to remember that when chemical changes/reactions occur, you’ve mixed two things together to make something new! Another important thing to remember – you cannot reverse a chemical change, whereas you can reverse a physical change.
Step 3
We continued to explore chemical reactions with another experiment! Put half a lemon into a cup, so that the rind is facing downwards, and put a spoonful of baking soda on top of the lemon. Add a few drops of food coloring on top of the lemon and baking soda. Take a popsicle stick and push the baking soda down into the lemon. Note what happens when the citric acid from the lemon and baking soda mix and a chemical reaction takes place!
Step 4
For our last experiment, we used a chemical reaction to blow up a balloon! Break up an Alka Seltzer tablet and put the pieces inside a balloon. Fill up your flask or bottle about halfway with water. Then stretch the balloon with the Alka Seltzer pieces over the opening of the bottle (you’ll probably need to hold the Alka Seltzer pieces in the bottom of the balloon as you do this. It helps to have two sets of hands!). Drop the Alka Seltzer pieces from the balloon into the water. Shake up the bottle and note what happens to the balloon!