 Print this resource
This guide is designed to help you introduce students to the exciting world of electronics, circuits, and wearable technology through a hands-on activity where they will sew and connect LEDs on a scarf using a LilyPad coin cell battery holder and conductive thread. The project aims to teach students how electrical circuits work, the basics of conductivity, and how to integrate electronics into fabric to create functional and stylish wearable tech.
How This Guide is Structured:
- Teacher Script for Students:
- A ready-to-use script that explains the core science concepts behind the project, including how circuits work, the properties of conductive materials, and the basics of wearable electronics. Feel free to read it directly to your students or adapt it to suit your teaching style.
- Key Concepts and Learning Goals:
- Students will learn about electrical circuits, including how to create a closed circuit that allows electricity to flow and light up LEDs.
- The project introduces the concept of conductivity and how conductive materials can be used in place of traditional wires, making it possible to embed electronics in clothing.
- Students will also gain hands-on experience with sewing techniques, integrating technology and crafts.
- Hands-On Experimentation:
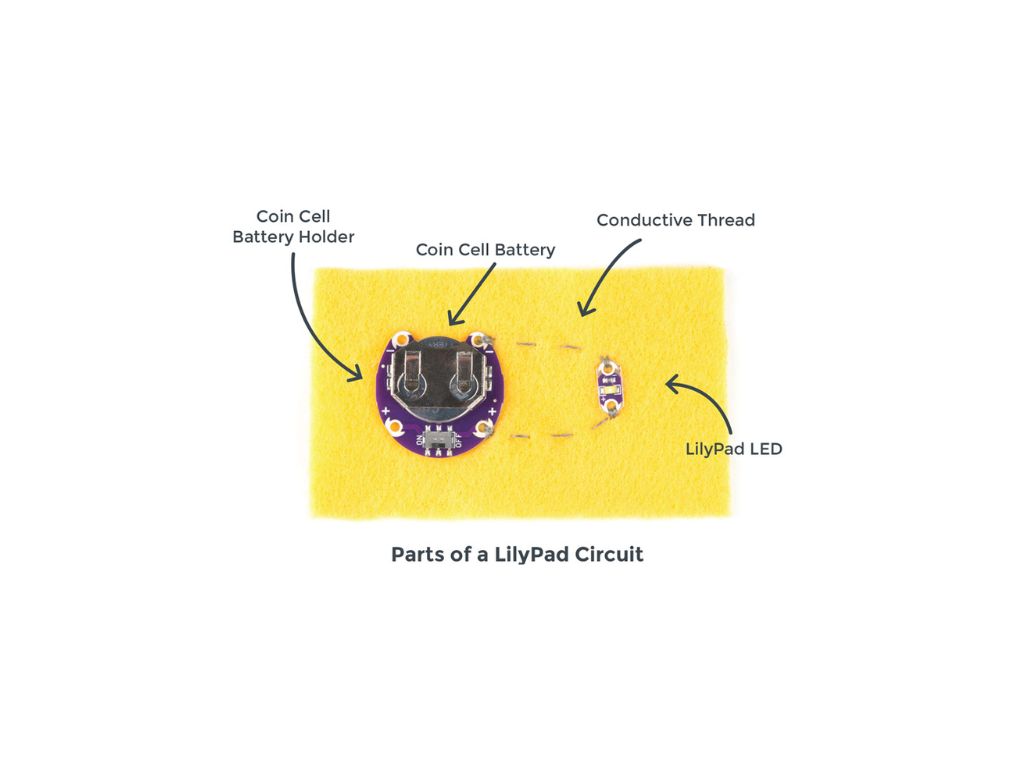
- Students will use a LilyPad coin cell battery holder, conductive thread, and LEDs to sew a simple circuit onto a scarf, creating a design that lights up when connected.
- Encourage students to experiment with different patterns and arrangements of LEDs, exploring how to connect them in series or parallel circuits.
- Discussion and Reflection:
- Guide students through a discussion on how the electrical circuits they created work, the role of the battery holder, and how conductivity allows electricity to flow through thread.
- Use reflection prompts to help students connect these concepts to real-world applications of wearable technology, such as fitness trackers, smart clothing, and e-textiles.
- Wrap-Up and Real-World Connections:
- Conclude the session by discussing the growing field of wearable technology, how electronics are being integrated into clothing, and the potential future innovations in e-textiles. Highlight how understanding electronics can lead to creative solutions and innovations in fashion, health, and more.
Teacher Script for Students
Today, we’re going to combine electronics and fashion by creating our own wearable tech — a scarf that lights up with LEDs! But before we start sewing, let’s talk about the science that makes this possible.
Electrical Circuits: How Do They Work?
To make our LEDs light up, we need to create a complete electrical circuit. A circuit is a path that electricity follows. For electricity to flow, the circuit needs to be closed, meaning there are no breaks in the path. If there’s a break, the electricity can’t flow, and the LEDs won’t light up.
In a basic circuit, we have:
- A power source (like a battery connected to a LilyPad coin cell battery holder)
- Conductive materials (like wires or, in our case, conductive thread)
- A load (the LEDs that will light up)
When you connect everything correctly, electricity will flow from the battery, through the conductive thread, to the LEDs, and back to the battery, completing the circuit.
Using Conductive Thread:
Usually, we use wires to carry electricity, but today we’re using conductive thread. This special thread can conduct electricity just like a wire, but it’s flexible and can be sewn into fabric. That means you can create circuits that are wearable, like the scarf you’ll be making today. Conductive thread is perfect for projects like this because it’s strong, flexible, and lets us embed technology into soft materials.
Building Your Wearable Circuit:
Now it’s time to get hands-on! You’ll be using a LilyPad coin cell battery holder, conductive thread, and LEDs to sew a circuit onto your scarf. The LilyPad battery holder will be your power source, while the thread will connect everything together.
As you sew, you’ll be creating paths for electricity to flow, lighting up the LEDs when everything is connected. You can get creative with the design — place your LEDs in a pattern you like, and then carefully sew the conductive thread to connect them to the battery holder.
Make sure your stitches are neat and don’t cross, or you might accidentally short-circuit your design, which would cause the LEDs not to light up. You’ll also need to pay attention to the positive (+) and negative (-) sides of the LEDs and make sure they are connected properly.
Experimentation: Creating Unique Designs
Once you have the basics, you can start experimenting. Try connecting your LEDs in different patterns, or adjust how they’re powered to see how it affects their brightness. Want your scarf to light up in a cool design? Play around with how you place and connect the LEDs. This is your chance to be both a scientist and an artist!
Wrap-Up and Real-World Connections
After we’ve completed our wearable tech, let’s talk about where we see these concepts in the real world. Wearable technology is becoming more popular every day. Think about fitness trackers that measure your heart rate, smart jackets that can control your music, and light-up sneakers. All of these use the same basic principles of circuits and conductivity that you’re using today.
By learning how to create simple circuits, you’re getting a glimpse into how engineers design e-textiles and smart clothing that can do amazing things. As we explore the future of fashion and technology, understanding these basic concepts can lead to innovative solutions that improve lives.
So, let’s get started and see how you can light up your world with your very own LED wearable!