Time: 35 to 40 minutes (build plus field testing)
Big idea: Magnetism is a force that acts without touching. Students build art that flies on an invisible pull, then test how far and through what that pull can reach.
Standards Snapshot: Virginia SOL + NGSS
Pick your grade band. The build is the same, the thinking changes.
| Grade | Virginia SOL | NGSS | Students walk away able to… |
|---|---|---|---|
| K | K.2: pushes and pulls affect the motion of objects | K-PS2-1 | Show that the magnet pulls the paper clip without touching it. |
| 2 | 2.2: magnets attract and repel, have poles, attract certain metals, and have useful applications (primary fit) | — | Predict and test which materials a magnet attracts, and explain the flying trick using attract and pole. |
| 3 | — | 3-PS2-3 · 3-PS2-4 | Investigate how the magnetic force changes with distance, and treat the build as a design problem solved with a magnet. |
| 5 | 5.2: direct and indirect forces affect the motion of objects | — | Explain that magnetism is an indirect force that weakens with distance, using the hover zone measurement as evidence. |
| K–5 | X.1: Scientific and Engineering Practices | K-2/3-5-ETS1-2 | Predict, test, measure the force’s reach, and explain results from evidence. |
Practices exercised (both frameworks): asking questions and predicting · planning and carrying out investigations · measuring and charting data · constructing explanations from evidence. NGSS Crosscutting Concept: Cause and Effect.
Curiosity & Wonder
Do not define magnetism yet. Hold a magnet near a paperclip on the table and let the clip jump.
“I never touched it. Nothing touched it. So what moved it? Can a force be real if you cannot see it? How would we prove it is there?”
Take guesses and write them down. Then: “Today we are going to catch this invisible force in the act, and make art fly with it.”
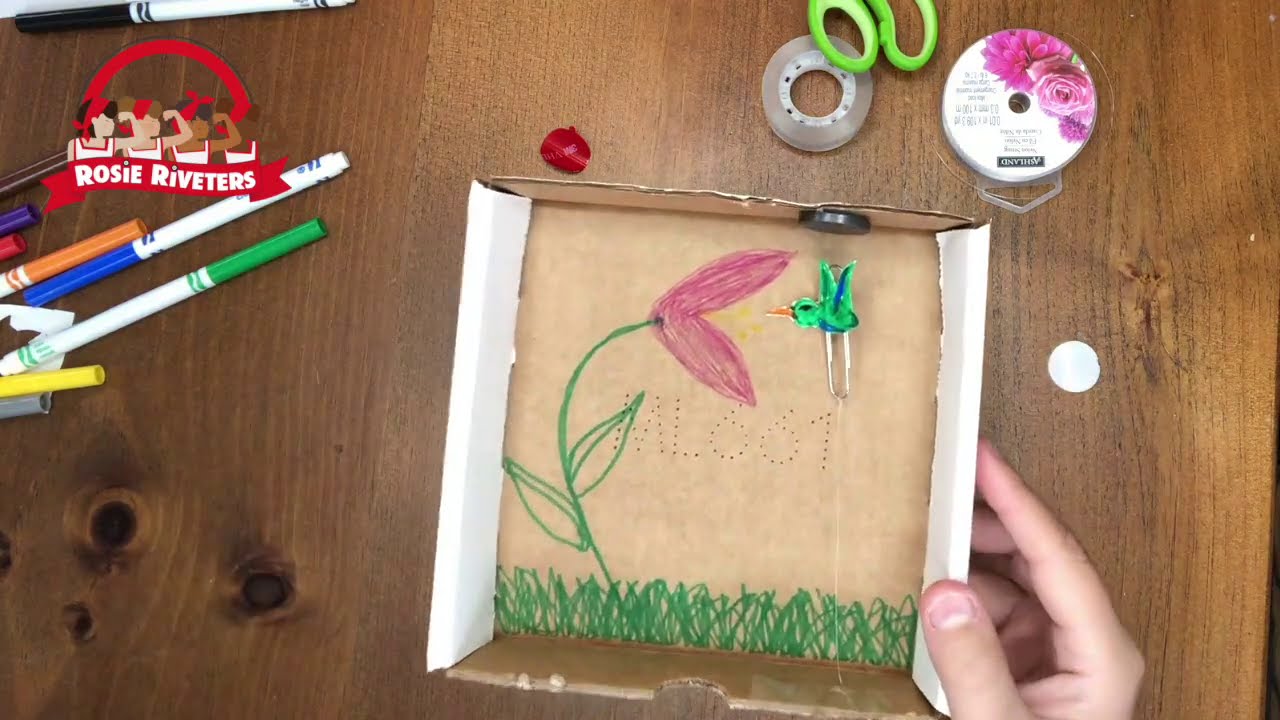
The Build
Materials per student: box, white paper, markers, scissors, magnet, double-sided adhesive, paperclip, fishing line, tape.
- Draw a background scene on the inside bottom of the box.
- On white paper, draw a small “flying” object that fits the scene (a bird, rocket, bee, superhero), no larger than 1.5 by 1.5 inches and slightly larger than the paperclip.
- Cut out the flying object.
- Attach the magnet to the top inside wall of the box with the double-sided adhesive.
- Tie one end of the fishing line to the paperclip.
- Tape the flying object to the paperclip so the line hangs below the drawing.
- Tape the other end of the fishing line to the bottom inside wall, opposite the magnet, with the line running perpendicular to the tape strip so it can be adjusted.
- Adjust the line length until the paperclip is pulled by the magnet but hangs in the air without touching it. Your object is flying!
Productive struggle moments
Our STEM projects are designed so that participants get it wrong before they get it right. You will observe your students struggling as they attempt to create their own STEM projects. This process is an empowering experience, building perseverance, frustration tolerance and growing overall confidence! With your support, students will step out of their comfort zones to think, build and problem-solve for themselves.
- Cutting a small shape cleanly takes patience. Ragged edges still fly.
- Taping the line so it holds tension without slipping takes a few tries.
- Tying a knot in slippery fishing line is genuinely hard. Three tries is the point. Depending on the grade level your kit may include a pre-tied fishing line & paper clip. The goal is productive struggle not just struggle.
- Step 8 is the boss level. Too much line and the clip flops; too little and it sticks to the magnet. Finding the float zone is trial and error by design. Narrate instead of fixing: “You are doing the hard part right now. What happens if you shorten the line just a tiny bit?”
A clip stuck to the magnet or slumped on the floor is not a failed build. It is evidence about where the force is strong and where it runs out.
The Investigation
The hover zone is a real scientific boundary: the edge of the magnetic field. Now students map it.
Measure the reach (grades 2+): slowly lower the flying object away from the magnet. At what gap does it fall? Measure that distance with a ruler. Compare across the class: is everyone’s hover zone the same? Why might they differ? (Heavier art, stronger magnets, line angle.) This is data collection with a built-in reason to care.
Test the barrier question: will the magnet still pull the clip through a piece of paper? Through cardboard? Through your hand? Predict first, then test. (The force passes through non-magnetic materials, which is why the trick works through the art itself.)
Run the ferromagnetic hunt (the heart of standard 2.2): predict which classroom objects a magnet will attract, test each one, and chart the results in two columns. The pattern that emerges: magnets only attract certain metals (iron, nickel, cobalt). Not all metals stick (try a soda can or a coin), and that surprise is the finding.
Explain the mechanism (grade-band it):
- Kindergarten: The magnet pulls the clip without touching it. Some pulls are invisible.
- Grade 2: Magnets have two poles, north and south. Opposite poles attract, same poles repel, and the magnet attracts the steel paper clip from a distance. Say it together in funny voices: opposites attract, same sides repel.
- Grade 3: Magnetic force acts at a distance and gets weaker as the gap grows, which is exactly what the hover zone measurement shows. The build is a design problem solved with a magnet, which is engineering.
Skills in Practice
- “I predict the magnet will / will not attract ___ because ___.”
- “My clip fell when the gap was ___ centimeters.”
- “My evidence shows the magnetic force gets ___ as the distance gets ___.”
- “The magnet worked through ___ but the pull felt ___.”
Real-World Connection
Invisible magnetic force runs the world: refrigerator doors seal with magnets, maglev trains in Asia float on them at nearly 300 miles per hour, junkyard cranes lift cars with electromagnets, and every compass on Earth points north because the planet itself is a giant magnet. Ask: “Where is a magnet hiding in your house right now?” (Fridge, cabinet latches, phone chargers, headphones, toys.)
Evidence of Learning
- Kindergarten: Student demonstrates the flying art and says the magnet pulls the clip without touching it.
- Grade 2: Student sorts three objects into “magnet will attract / will not attract,” tests, and states one sentence about the result using attract.
- Grade 3: Student writes 2 to 3 sentences explaining the hover zone using the words force and distance, backed by their gap measurement.
Vocabulary
- magnet: an object that pulls certain metals and can pull or push other magnets.
- attract: to pull toward.
- repel: to push away.
- pole (grades 2+): one of the two ends of a magnet, north or south; opposite poles attract, same poles repel.
- magnetic field (grade 3+): the invisible space around a magnet where its force works; the hover zone marks its edge.