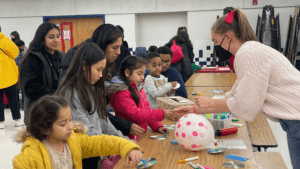
The Rosie Innovators STEM Night is an evening of hands-on science, math, and engineering activities for families to complete together. Focusing on elementary-school students, it aims to get kids excited about STEM!
STEM Night is a community-based event designed and executed by the Rosie Innovators – young women in high school that are preparing to pursue STEM in college (and beyond)! These young women have researched, developed, and presented all the hands-on projects at STEM Night in order to share their passion for STEM with children and inspire the next generation in the field.
Read on below for details about each hands-on project, including fun facts about a real woman in STEM working in the field and instructions to complete the project at home!
Want to host a Rosie Innovators STEM Night at your elementary school? Email info@rosieriveters.com! To learn more about the Rosie Innovators program for young women in high school, please visit https://rosieriveters.org/programs/ and scroll to the Rosie Innovators section.
STEM Night Activities and Presenters
Resource 1
Rosie Innovators Make Bobbin Pulleys by Emma
Rosie Innovators Make Bobbin Pulleys
https://handsonstem.rosieriveters.com/resources/rosie-innovators-make-bobbin-pulleys/
Resource 2
Rosie Innovators Make Hovercrafts by Hope
Rosie Innovators Make Hovercrafts
https://handsonstem.rosieriveters.com/resources/rosie-innovators-make-hovercrafts/
Resource 3
Rosie Innovators Build Toothpick Constellations by Kathryn, Julienne, and Kate
Rosie Innovators Build Toothpick Constellations
https://handsonstem.rosieriveters.com/resources/rosie-innovators-build-toothpick-constellations/
Resource 4
Rosie Innovators Make Kaleidoscopes by Qiaojing and Emma
Rosie Innovators Make Kaleidoscopes
https://handsonstem.rosieriveters.com/resources/rosie-innovators-make-kaleidoscopes/
Resource 5
Rosie Innovators Make DNA Models by Ella and Samantha
Rosie Innovators Make Candy DNA Models
https://handsonstem.rosieriveters.com/resources/rosie-innovators-make-candy-dna-models/
Resource 6
Rosie Innovators Make Planet Orbit Models by Illana
Rosie Innovators Make Planet Orbit Models
https://handsonstem.rosieriveters.com/resources/rosie-innovators-make-planet-orbit-models/
Resource 7
Rosie Innovators Make Marble Jumping Beans by Niittisha
Rosie Innovators Make Marble Jumping Beans
https://handsonstem.rosieriveters.com/resources/rosie-innovators-make-marble-jumping-beans/
Resource 8
Rosie Innovators Make Ping Pong Catapults by Olivia
Rosie Innovators Ping Pong Ball Catapult
https://handsonstem.rosieriveters.com/resources/rosie-innovators-ping-pong-ball-catapult/
Resource 9
Rosie Innovators Make Bath Bombs by Catherine
Rosie Innovators Make Bath Bombs!
https://handsonstem.rosieriveters.com/resources/rosie-innovators-make-bath-bombs/
Resource 10
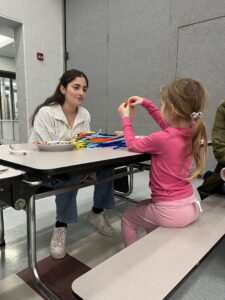
Rosie Innovators Make Amino Acid Bracelets by Rachel
Rosie Innovators Make Amino Acid Bracelets
https://handsonstem.rosieriveters.com/resources/rosie-innovators-make-amino-acid-bracelets/
Resource 11
Rosie Innovators Make Glow-in-the-Dark Moon Phases Magnets by Anna
Rosie Innovators Make Glow-in-the-Dark Moon Phases Magnets
https://handsonstem.rosieriveters.com/resources/rosie-innovators-make-glow-in-the-dark-moon-phases-magnets/
Resource 12
Rosie Innovators Make Enzyme Tetris by Anna
Rosie Innovators Make Enzyme Tetris
https://handsonstem.rosieriveters.com/resources/rosie-innovators-make-enzyme-tetris/
Resource 13
Rosie Innovators Make Density Towers by Maddie
Rosie Innovators Make Density Towers
https://handsonstem.rosieriveters.com/resources/rosie-innovators-make-density-towers/
Resource 14
Rosie Innovators Make Foundations of Foundations by Isla
Rosie Innovators Make Foundations of Foundations
https://handsonstem.rosieriveters.com/resources/rosie-innovators-make-foundations-of-foundations/
Resource 15
Rosie Innovators Make Archimedes Screw by Suhani
Rosie Innovators Make Archimedes Screw
https://handsonstem.rosieriveters.com/resources/rosie-innovators-make-archimedes-screw/
Resource 16
Rosie Innovators Make Artificial Lungs by Taylor
Rosie Innovators Make Artificial Lungs
https://handsonstem.rosieriveters.com/resources/rosie-innovators-make-artificial-lungs/
Resource 17
Rosie Innovators Make Airborne Wonders by Mary Kate
Rosie Innovators Make Airborne Wonders
https://handsonstem.rosieriveters.com/resources/rosie-innovators-make-airborne-wonders/
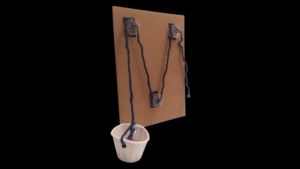
Rosie Innovators Make Bobbin Pulleys
Simple machines make up almost all mechanical systems. They make tasks easier, because the effort is spread over a longer distance – that way less force needs to be applied by you! Pulleys are a kind of simple machine that can be found in systems like elevators, drawbridges, and construction cranes.
In this project created by Emma, a member of the Rosie Innovators STEM program for young women in high school, you’ll be building your own pulley system to lift pennies. When pulleys have more fulcrums, or points where the string turns, it is easier to lift things. Other levers also have fulcrums, like the point where the board balances on seesaws! It would be very difficult to lift someone on the opposite end of a long board, but by placing a fulcrum in the middle, it is easy to make them go up and down.
Ready to make this project at home or in your classroom? Gather the materials listed at the right, and follow the instructions below!
Required Materials
- 3 plastic bobbins or spools
- 1 piece of cardboard (cereal boxes work well!)
- 3 x the length of the cardboard string
- easel (optional)
- double sided adhesive
- hole punch
- mini paper cup
- 10 pennies or other small weights
Step-By-Step Instructions
Step 1
Take three pieces of tape or three dots of hot glue and stick them to the cardboard piece in the shape of an upside-down triangle. They should be at least three inches apart.
Step 2
Stick the flat side of one bobbin to each piece of tape or dot of glue.
Step 3
Punch a hole in each side of the mini cup and run the string through it. Tie one end of the string to the other side just above the cup.
Step 4
Run the string through the bobbins, starting with the one furthest to the left. The pattern is over, under, over.
Step 5
Place the cardboard on the easel for stability (optional).
Step 6
Fill the cup with pennies, and pull gently on the end of the string to lift the cup!
Step 7
Experiment with different routes for the string through the bobbins to see if you can make a new pulley system!
Step 8
Note: Friction is a force that works against the direction of an object moving against something else. When objects rub together, it slows the motion down. You might notice that when your cup has more pennies in it (i.e., more weight), it’s harder to lift even with the pulley, because the string is creating more friction with the bobbins. Different kinds of string create more or less friction–try using different types and see what happens!
Real Women in STEM
Resource 1
Vanessa Galvez
Not all influential engineers build technologies for spacecrafts. Some, like Vanessa Galvez, have made an out-of-this-world impact in their own communities! Galvez is a civil engineer who became interested in engineering after watching a documentary about levees that stopped working during Hurricane Katrina. As a kid, she loved taking things apart and putting them together. At age 26, she led a project installing bioswales in Queens, NY. Bioswales help absorb stormwater runoff and protect the city from pollution and flooding. Galvez’s work can provide a blueprint for future urban-improvement projects, protecting the environment for generations to come.
Resource 2
This project was created by Emma, a sophomore at Washington-Liberty High School. Emma has loved STEM since she was little, because she enjoys figuring out what makes things work, from plants to airplanes to humans. According to Emma, “If we understand the world more deeply, then we can come up with better solutions to our problems!” She’s most passionate about environmental science, but is always up for learning about something new.
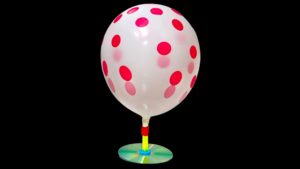
Rosie Innovators Make Hovercrafts
In this project created by Hope, a member of the Rosie Innovators STEM program for young women in high school, you will make your very own “levitating” hovercraft! This hovercraft flies when air pressure in a balloon is released and produces a cushion of air for the hovercraft to float on.
A hovercraft is a vehicle that releases strong currents of air underneath it. When the air gets trapped under the hovercraft, it produces a cushion of air for the hovercraft to glide over. Based on Newton’s 3rd Law – Action and Reaction – when this air is pushed down from the hovercraft, it applies a force on the ground which then pushes the hovercraft up – an equal and opposite reaction. In other words, air down, craft up! The hovercraft’s air cushion reduces friction, or the resistance from 2 objects rubbing together, because the hovercraft doesn’t touch the surface. Instead, it flies above it, making the hovercraft amphibious, i.e., able to travel on/between land and water. It’s like a hybrid between a boat, plane, and helicopter!
Ready to make your hovercraft at home or in your classroom? Gather the materials listed at the right, and follow the instructions below! But be careful – this hovercraft might just blow your socks off!
Step-By-Step Instructions
Step 1
Cut the milkshake straw to about 3 inches long (or experiment with different lengths).
Step 2
Use putty to seal the straw to the CD by inserting the straw into the center hole of the CD and securing with the putty (make sure no air can escape!). Only about ½ inch of the straw should stick out the bottom.
Step 3
Insert the top side of the straw (longer side) into a balloon and secure it with tape (again, make sure no air can escape!).
Step 4
To fly, blow up the balloon from the ½ inch of straw sticking out on the bottom. When you’re done inflating the balloon, pinch it to hold the air and place the hovercraft upright on a surface. When you’re ready, let go and watch it glide away!
Step 5
Troubleshooting: If your hovercraft doesn’t fly the first time, don’t worry, this is an important stage in the design process that real life engineers use everyday: testing and modifying. Try experimenting with the amount of air in your balloon, the length of the straw, and the places you have tape or putty (make sure air can only get out through the bottom of the straw. You can test this by blowing up the balloon and clogging the straw with your finger. If you hear air escaping elsewhere, you’ll need to find where it’s leaking and patch it).
For an advanced challenge, try directing the hovercraft’s flight path by confining it in a walled race track or adding weights to certain sides of the CD!
Real Women in STEM
Resource 1
Mary W. Jackson
Mary W. Jackson, born in Virginia in 1921, was the first African-American female engineer to work at NASA. Like most women at NASA in the 1950s, she began in the “computing” pool, but after completing special math and physics classes at the University of Virginia, she became an official engineer, focusing on the ways the boundary layer of air behaves around airplanes. Despite many achievements, Mary was not promoted to the highest levels at NASA because people treated her unfairly due to her race and gender. So, she became the manager of the Federal Women’s Program and worked to increase the number of women hired as mathematicians, engineers, and scientists. Before retiring, Mary received many awards recognizing her efforts to help women in STEM!
Resource 2
This project was created by Hope, a senior at Georgetown Visitation Preparatory School. Hope has loved all things STEM since she joined Rosie Riveters in fourth grade. In school, she enjoys advanced math and science classes as she works towards becoming an engineer. In addition to playing flute in both her school orchestra and a local college band, competing on the varsity crew team, and serving her community, she is a member of her school’s engineering and design club and president of the coding club. She loves to merge logic and creativity in STEM, and looks forward to changing the world as a woman in STEM!
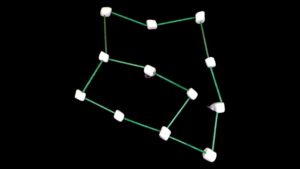
Get ready to explore the solar system!
In this project created by Kathryn, Kate, and Julienne, members of the Rosie Innovators STEM program for young women in high school, you will investigate the principles of astronomy by building toothpick constellations! You’ll learn about constellations and their role in our solar system – from the Little Dipper, Big Dipper, Orion, Cygnus, Cepheus – the choice is yours!
Ready to get started? Gather the materials listed at the right, and follow the instructions below! Use these Printable Constellation Flashcards as a guideline for creating your constellations.
Required Materials
- white crayon or pencil
- black cardstock
- 10-12 toothpicks
- tape
- constellation templates
Step-By-Step Instructions
Step 1
Select your preferred constellation from these Printable Constellation Flashcards.This will be your guideline for creating your constellations.
Step 2
Draw your constellation on a piece of black cardstock. Mark a dot for each star, and connect them with lines that are the length of a toothpick.
Step 3
Place marshmallows over the dots and connect them with toothpicks.
Step 4
When your constellation is complete, tape the toothpicks to the cardstock.
Step 5
Label your constellation on the card!
Step 6
Real Women in STEM
Resource 1
Annie Jump Cannon
In the early 1900s, Annie Jump Cannon created the modern star classification system, “OBAFGKM,” which classifies stars by temperature. The system was based on her observations of over 10,000 stars. Cannon was a part of a Harvard Observatory group called “Pickering’s Women,” and she cataloged and classified over 350,000 stars. She discovered 300 variable stars, 5 novae stars, and 1 binary star! Cannon received the Henry Draper Gold Medal of the National Academy of the Sciences and was the first woman to receive an honorary doctorate of science at Oxford. Cannon was one of the first women in astronomy and also faced the hardship of being deaf.
Resource 2
This project was created by a team of three Rosie Innovators – Kathryn, Julienne, and Kate!
Kathryn is a junior at Washington-Liberty High School. Her interest in STEM began in preschool science class and has grown into an academic and extracurricular endeavor. In college, Kathryn plans to study biomedical technology or immunology.
Julienne is a ninth grader at Charles J. Colgan Sr. High School. Raised in a family of engineers, Julienne naturally became interested in STEM, which has led to her current interest and participation in VEX Robotics. In college, Julienne plans to study systems engineering.
Kate is a sophomore at Bishop Ireton High School. She first became interested in STEM in middle school when attending a coding camp, and from there went on to attend different STEM-related camps and programs including a camp at West Point! In college, Kate plans to study criminology or psychology.

Did you know that light isn’t a thing (i.e., matter)? That’s right, most objects don’t make their own light, rather we see things because they reflect light! For example, we can see the moon because it reflects light from the sun, our main source of natural light. If an object did not reflect any light, we would not be able to see it!
In this project created by Qiaojing and Emma, members of the Rosie Innovators program for young women in high school, you will make a kaleidoscope! This awesome device creates cool images via the reflection of light from objects on metallic or mylar paper.
Ready to make this project at home or in your classroom? Gather the materials listed on the right and follow the instructions below to build a fun kaleidoscope!
Required Materials
- 1 craft roll
- clear plastic (egg carton, packing material, etc.)
- 1 card stock
- 1 mylar or metallic sheet
- tape
- translucent colored beads
- confetti
- small circular drawings
Step-By-Step Instructions
Step 1
Place the paper tube on the clear card stock and trace out two circles using the tube as a reference.
Step 2
Place the paper tube on the white cardstock, and trace out one circle.
Step 3
Draw a rectangle that is 4.1 in x 3.4 in (10.4 cm x 8.5 cm) on the metallic paper.
Step 4
Cut out all the circles and the rectangles. Be sure to cut a small hole out of the center of the white cardstock circle to look through.
Step 5
Fold the metallic rectangle into three equal sections (about 1.35 inches each).
Step 6
Bring the two ends of the rectangle together to form a prism, and secure the seam with tape.
Step 7
Place the prism into the tube.
Step 8
Place the white cardstock eyepiece (circle) on to one end of the paper tube, and secure with tape.
Step 9
Place one of the clear plastic circles into the craft tube on top of the prism, and secure with tape.
Step 10
Fill the space between the clear plastic and the uncovered end of the craft tube with decorations (this can be confetti, beads, or anything small).
Step 11
Place the other clear plastic circle at the top of the tube containing the decorations and secure with tape.
Step 12
The kaleidoscope is done! You can also decorate it with markers.
Real Women in STEM
Resource 1
Yu-Jung Lu
Yu-Jung Lu is currently an assistant professor of physics at National Taiwan University. She is a material physicist, meaning that she studies the physical properties of matter in molecules and nanostructures. Her research focuses on devices that investigate harvesting, generating, and manipulating light at the nanoscale. She also works actively to inspire young people to pursue careers in STEM.
Resource 2
This project was created by a team of two Rosie Innovators – Qiaojing and Emma!
Qiaojing is a junior at Washington-Liberty High School. She is most interested in computer science, but physics and chemistry are also her favorites! Qiaojing’s interest in STEM is driven by her curiosity about the creation of things, and the realization of her strength in the domain.
Emma is in ninth grade, and is homeschooled. She is interested in several STEM fields, including engineering, biology, psychology, and physics. STEM intrigues her because it helps her understand the world around her in ways she’d never thought of before!
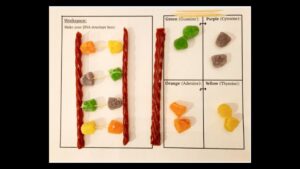
In this project created by Ella and Samantha, members of the Rosie Innovators STEM program for young women in high school, you will create your own DNA strand out of candy to learn more about DNA structures! Using a template (see below), you’ll organize different colors of candy to create DNA base pairs (adenine with thymine and cytosine with guanine) and connect them with toothpick hydrogen bonds and a twizzler backbone.
DNA is a material in all living things that codes for different traits. The two different pairs of colors that you’ll pair in the DNA models represent different base pairs that make up your DNA. These are like puzzle pieces – as one piece always pairs with another in a puzzle, so does DNA. In these models, just like DNA, in the real world, adenine always pairs with thymine and guanine always pairs with cytosine!
Now that you know about DNA and what makes up its structure, it is time to make your own DNA model out of candy! Gather the materials listed to the right, print out the DNA template, and follow the instructions below!
Required Materials
- 1 plate
- 8-10 toothpicks
- 2 Twizzlers
- 8 gum drops
- 1 DNA template
- hand wipes
Step-By-Step Instructions
Step 1
Gather the toothpicks, two twizzlers, and gumdrops. Place the DNA Template on your plate.
Step 2
Sort the gumdrops by color on your template.
Step 3
Start by putting a toothpick into one side of the twizzler.
Step 4
Put a pair of gumdrops on that toothpick.
Step 5
Repeat this with the rest of the toothpicks and gumdrops.
Step 6
Attach the second twizzler to the other side of all of the toothpicks.
Step 7
If you want a challenge, twist your twizzlers to create a double helix shape!
Women in STEM
Resource 1
Rosalind Franklin
Rosalind Franklin was a key pioneer in the study of the structure of DNA. She was one of very few females in the field, and discovered in the early 1950s that DNA exists in the form of a helix, which is its characteristic spiral shape. Despite Franklin’s discovery, James Watson and Francis Crick are often credited with establishing the double helix structure of DNA. Franklin also contributed to the better understanding of the the structure of viruses, helping to lay the groundwork for the field of virology. Overall, Rosalind was a hard worker, and went on to publish six scientific papers even while battling ovarian cancer.
Resource 2
This project was created by a team of two Rosie Innovators – Ella and Samantha!
Ella is a sophomore at Oakton High School. She’s drawn to STEM because, as she puts it, “whether it’s finding cures for diseases or creating new technology, science has so much application in the real world. It constantly brings new advancements and understandings!”
Samantha is a sophomore at Meridian High School. She is especially interested in biology because it includes numerous opportunities for medical advancements that could improve people’s lives and opens the door to information that increases our knowledge about the world we live in.

Rosie Innovators Make Planet Orbit Models
Planets don’t travel in perfect circles—they follow stretched-out paths called ellipses. This idea comes from Kepler’s First Law, which tells us that a planet’s orbit around the Sun is an oval shape. That’s why sometimes a planet is closer to the Sun and sometimes it’s farther away. These changing positions also explain why we see different constellations at different times of the year!
In this project created by Ilana, a member of the Rosie Innovators STEM program for young women in high school, you’ll model planetary orbits to see Kepler’s First Law in action. Curious how planets travel through space? Gather your supplies and follow the steps below!
Step-By-Step Instructions
Step 1
Take the foam and place it down with the long side on top.
Step 2
Insert one of the golden brads about 1/3 of the way down the long side of the foam in the middle of the short side. Make sure to leave a little gap between the foam and the head of the brad.
Step 3
Insert the other golden brad about 2/3 of the way down the long side of the foam in the middle of the short side. Make sure to leave a little gap between the foam and the head of the brad.
Step 4
Take the loop of string and put it down around the brads.
Step 5
Insert the tip of the marker into the loop and pull it outward until the string is tight.
Step 6
Move the marker around the pins keeping the thread tight. This traces the orbit of the planets around the sun.
Step 7
Take out the marker from the string.
Step 8
Remove the loop of string and one of the golden brads so that only the orbit and 1 golden brad are left.
Step 9
Take one of the colorful brads and place it somewhere on the oval to represent the planet.
Step 10
Decorate the foam however you want to represent stars.
Real Women in STEM
Resource 1
Heidi B. Hammel
Heidi B. Hammel is a planetary scientist who has worked on many NASA missions, including the Gemini, Hubble, Spitzer, and Keck telescopes. She has been recognized for her communication as an active planetary scientist to the public and has been a key contributor to a more recent understanding of both planets within and outside our solar system.

Rosie Innovators Make Artificial Lungs
Your lungs and a special muscle called the diaphragm work together to help you breathe. The diaphragm sits under your lungs like a stretchy balloon. When you breathe in, it pulls down, making more room in your chest and letting your lungs fill with air full of oxygen – something your body needs to stay alive! When you breathe out, the diaphragm pushes up, squeezing the air out and getting rid of things your body doesn’t need, like carbon dioxide. It’s like a perfectly timed dance between muscles and air that keeps you breathing without even thinking about it!
In this project delivered by Taylor, a member of the Rosie Innovators STEM program for young women in high school, you’ll build a model of the lungs and diaphragm to see exactly how breathing works. Ready to take a deep breath and dive in? Grab your materials and follow the steps below!
Required Materials
- small plastic cup with a hole
- Two small balloons
- two small straws
- large balloon
- tape
- scissors
Step-By-Step Instructions
Step 1
Ask an adult to help you poke a hole in the center of the bottom of the plastic cup using a drill or a sharp object. The hole should be just big enough for the two straws to fit through.
Step 2
Tape one water balloon securely to the end of each stirring straw. Make sure the water balloons are tightly attached and there are no gaps where air can escape.
Step 3
Flip the cup upside down so that the opening is facing down. Insert the straws through the hole from the cup opening so the water balloons are inside the cup.
Step 4
Move the straws up until they are a little more than halfway inside the cup.
Step 5
Tape around the straws and hole to ensure the straws stay in place and air can’t escape from the hole.
Step 6
Cut off the neck of the regular balloon and stretch the remaining part of the balloon over the wide opening of the plastic cup. You might need help from someone else to stretch it securely.
Step 7
The lung model is complete. To see it in action, pull down on the bottom balloon to inflate the “lungs” inside the cup.
Real Women in STEM
Resource 1
Dr. Claudia Henschke
Dr. Claudia Henschke is a radiologist and professor of radiology best known for pioneering the use of low-dose CT scans for early lung cancer detection. Her work has transformed lung cancer screening, enabling early diagnosis and treatment that has saved countless lives.
Rosie Innovators Make Archimedes Screw
The Archimedes screw is a simple machine that has been used for thousands of years to move water uphill. It looks like a giant spiral wrapped around a tilted tube. When you turn the tube, the spiral inside scoops up water at the bottom and carries it higher and higher with each spin. The water gets trapped in the pockets made by the spiral shape, almost like riding an elevator made out of water! This clever design uses motion and shape together to move water without needing any engines or electricity.
In this project created by Suhani, a member of the Rosie Innovators STEM program for young women in high school, you’ll build your own Archimedes screw and discover how engineers in ancient times solved big problems with simple ideas. Ready to get spinning? Grab your materials and follow the steps below!
Required Materials
- craft roll
- plastic tubing
- duct tape
- scissors
- large bowl or container
- water
- food coloring
Step-By-Step Instructions
Step 1
Place tape at the bottom of the toilet paper roll, on both the outside and inside.
Step 2
Wrap the tubing around the toilet paper roll in a spiral.
Step 3
Tape the tubing in place
Step 4
If necessary, cut the tubing so that the ends of the tube do not extend past the end of the roll too much.
Step 5
To use, hold the craft at a 45 degree angle and spin the tube to scoop up the water.
Real Women in STEM
Resource 1
Henrietta Vansittart
Henrietta Vansittart was an English engineer in the 19th century known for inventing the Lowe-Vansittart propeller, which improved ship propulsion. Her design was inspired by the principles of the Archimedes screw, making ships more fuel-efficient and faster.
Rosie Innovators Make Enzyme Tetris
Enzymes are special proteins that help speed up chemical reactions in our bodies. For example, digestive enzymes break down food into smaller pieces that our cells can use for energy. Each enzyme has an “active site” – a spot shaped perfectly for its target (called a substrate), like a puzzle piece fitting exactly where it belongs. The right fit makes the enzyme able to do its job!
In this project created by Anna, a member of the Rosie Innovators STEM program for young women in high school, you’ll explore how enzymes work by playing a hands-on game of “Enzyme Tetris.” Ready to see how the perfect fit powers life’s reactions? Gather your materials and follow the steps below!
Required Materials
- cardboard sheets
- sticky white board graph paper
- tetris stickers
- scissors
Step-By-Step Instructions
Step 1
Cover a piece of cardboard with whiteboard paper
Step 2
Use scissors to cut your Tetris stickers into fun shapes. Some will be enzymes and some will be substrates (the pieces that fit together!).
Step 3
Peel the backing off the stickers and stick them onto the whiteboard. You can move them around and reuse them as much as you want!
Remember: In real life, enzymes are proteins in your body that speed up important jobs, like breaking down food. But they can only work if the substrate fits just right into the enzyme’s active site – just like your puzzle shapes!
Real Women in STEM
Resource 1
Emmanuelle Charpentier and Jennifer Doudna
Emmanuelle Charpentier and Jennifer Doudna shared the Nobel Prize in Chemistry for inventing an enzyme called Cas9 which can locate a specific gene and cut it out of our DNA like scissors. This tool has been revolutionary in cutting out genetic mutations that cause certain cancers or sickle cell anemia.

Rosie Innovators Make Density Towers
Density is all about how much “stuff” is packed into a space. A golf ball feels heavier than a ping pong ball because it’s more dense—it has more mass in the same amount of space. The same thing happens with liquids: heavier (more dense) liquids sink, and lighter ones float on top. That’s how you can stack them into a cool-looking tower!
In this project created by Maddie, a member of the Rosie Innovators STEM program for young women in high school, you’ll explore the concept of density by layering different liquids and seeing how they interact. Ready to build your own colorful density tower? Grab the materials and follow the steps below!
Required Materials
- plastic bottle
- 2 food coloring
- dish soap
- water
- Vegetable Oil
- Vegetable Glycerin
Step-By-Step Instructions
Step 1
Grab a bottle and open the cap.You will be adding equal amounts four different liquids to the bottle. Depending on the size of your bottle you will want to adjust the amount added.
Step 2
Add one drop of purple food coloring to your vegetable glycerin. Add the purple glycerin to your bottle.
Step 3
Next add the blue liquid (dish soap) to the bottle
Step 4
Next add one drop of green food coloring to your water. Add the green water to your bottle.
Step 5
Next add the yellow liquid (canola oil) to the bottle.
Step 6
Screw the cap on tight and enjoy the project! Bonus: Place your finished project into the flashlight of a phone and see the colored layers even better!
Real Women in STEM
Resource 1
Dorothy Crowfoot Hodgkin
Dorothy Crowfoot Hodgkin was a chemist who used machines to look inside of crystals and see how atoms are arranged. Her work allowed for other scientists to understand the concept of density and progress the creations of new medicines.

Rosie Innovators Ping Pong Ball Catapult
Ping Pong balls can fly across the room thanks to potential and kinetic energy—and a simple rubber band! When you stretch the band back, you store energy (just like a slingshot). Letting go releases that energy, turning it into motion that launches the ball forward. The more you stretch, the more energy—and the farther it goes!
In this project created by Olivia, a member of the Rosie Innovators STEM program for young women in high school, you’ll build your own ping pong ball catapult to explore how energy can be stored and released to make things move. Ready to launch into action? Gather your materials and follow the steps below!
Required Materials
- rubber bands
- popsicle sticks
- plastic spoon
- ping pong ball
Step-By-Step Instructions
Step 1
Stack 5 popsicle sticks and tightly wrap one end with a rubber band.
Step 2
Pull apart the other end slightly and insert a new popsicle stick horizontally, creating a cross shape.
Step 3
Wrap another rubber band around the opposite end of the stack to secure it.
Step 4
Lay the spoon on top of the horizontal stick, with the handle pointing toward the center of the cross.
Step 5
Secure the spoon handle to the stick by wrapping a rubber band around them. The spoon should sit at an angle.
Step 6
Place a ping pong ball in the spoon. Pull the spoon back, let go, and watch the ball fly!
Real Women in STEM
Resource 1
Hypatia
Hypatia was an ancient mathematician and physicist who studied the motion of objects and how forces work. Her work helped people understand how things move through the air, similar to how your catapult launches a ball using energy and motion.

Rosie Innovators Make Foundations of Foundations
A foundation is what supports the weight of a building, keeping it stable and secure. The type of foundation used depends on two key factors: the weight of the building and the type of soil beneath it.
If a foundation is too weak, the building may sink or crack over time. That’s why a strong foundation is essential for a strong, long-lasting structure!
In this project created by Isla, a member of the Rosie Innovators STEM program for young women in high school, you’ll explore how different foundations support weight and stability. Ready to test your own designs? Gather your materials and follow the instructions below!
Rosie Innovators Make Amino Acid Bracelets
Think of amino acids as tiny puzzle pieces that come together to build proteins—the molecules that help our bodies grow, repair, digest food, and fight germs. There are 20 different amino acids, and the order in which they connect determines the shape and job of the protein they form.
In this project created by Rachel, a member of the Rosie Innovators STEM program for young women in high school, you’ll make an amino acid bracelet to model how proteins are built. Each bead represents a different amino acid, and your unique pattern reflects how proteins are coded in real life. Just like real proteins, small changes in the sequence can lead to big differences in how they work!
Ready to create your own protein model? Gather your materials and follow the instructions below!
Required Materials
- pony beads (mixed colors)
- pipe cleaners
Step-By-Step Instructions
Step 1
Collect the pony beads in the colors you will need to create your protein
Step 2
Size the pipe cleaner to your wrist and fold over the pointy edges.
Step 3
String the beads on the pipe cleaner in order to create your protein
Step 4
Attach the two ends of the pipe cleaner around your wrist, and you will have your bracelet!
Rosie Innovators Make Bath Bombs!
Ever wonder why bath bombs fizz when they hit the water? It all comes down to a chemical reaction! When the bath bomb dissolves, the ingredients inside react with the water, releasing gas and creating bubbles.
This reaction is called an acid-base reaction. The acid (citric acid) and the base (baking soda) mix with water and form carbon dioxide gas, along with salt and water. This gas is what makes the bath bomb fizz!
In this project created by Catherine, a member of the Rosie Innovators STEM program for young women in high school, you’ll experiment with acids and bases to see this reaction up close. Ready to explore? Gather your materials and follow the instructions below!
Rosie Innovators Make Glow-in-the-Dark Moon Phases Magnets
The moon’s phases change based on its position relative to the Earth and the sun. As the moon orbits Earth and Earth orbits the sun, the sunlight hitting the moon shifts, creating different shapes in the night sky.
For example, during a New Moon, the sun is behind the moon, making it invisible to us. When the sun is to the right of the moon, the right side is illuminated, creating a First Quarter Moon. These phases follow a predictable cycle, helping us track time and understand our sky.
In this project created by Anna, a member of the Rosie Innovators STEM program for young women in high school, you’ll model the moon’s phases to see this pattern in action. Ready to explore? Gather your materials and follow the instructions below!
Required Materials
- glow in the dark paint
- magnetic canvas
- black circle stickers
- black light flashlight
- earth stickers
- paint brushes
- paper plate
Step-By-Step Instructions
Step 1
Put 8 black circle stickers in a circle on the magnetic canvas.
Step 2
Place 1 Earth sticker in the center of the ring of black stickers.
Step 3
Dip your sponge brush in the paint.
Step 4
Paint the entire circle to the left of Earth (this is our “full moon”).
Step 5
Paint the right half of the circle directly above Earth (this is our “first quarter moon”).
Step 6
Paint the left half of the circle directly below Earth (this is our “third quarter moon”).
Step 7
For the circle in the top left, paint the majority of the right half, leaving just a crescent exposed on the left (this is our “waxing gibbous moon”).
Step 8
Do the same for the circle on the bottom left, except paint most of the left half and leave a crescent on the right exposed (this is our “waning gibbous moon”).
Step 9
For the circle in the top right, paint only a thin crescent on the right half (this is our “waxing crescent moon”).
Step 10
Do the same for the circle on the bottom right, except paint the thin crescent on the left instead of the right (this is our “waning crescent moon”).
Step 11
Don’t forget to leave the circle to the right of Earth with no paint! (this is our “new moon”).
Step 12
Paint a thin line along the right edge of the canvas (this is our “sunlight”).
Step 13
Let the paint dry.
Step 14
Proudly display your canvas by sticking it to your fridge or another magnetic surface!
Real Women in STEM
Resource 1
Dr. Sarah Noble
Dr. Sarah Noble is a planetary geologist at NASA and her division (The Planetary Science Division) sends robot explorers on missions to all corners of our solar system. Dr. Noble even has a main-belt asteroid named after her (named 133432 Sarahnoble)!

Rosie Innovators Make Airborne Wonders
Airplanes stay in the air thanks to Bernoulli’s Principle, which explains how fast-moving air creates lower pressure. When air moves quickly over a surface, the pressure decreases.
For an airplane, air moves faster over the curved top of the wings, creating low pressure above and higher pressure below. This pressure difference generates lift, pushing the plane upward and keeping it in the sky!
In this project created by Mary Kate, a member of the Rosie Innovators STEM program for young women in high school, you’ll explore Bernoulli’s Principle with a hands-on experiment. Ready to see how air pressure creates lift? Gather the materials listed and follow the instructions below!
Required Materials
- 1 plastic straws
- masking tape
- 1 small plastic funnel
- 1 ping pong ball
Step-By-Step Instructions
Step 1
Bend the straw (at the built-in crevices) at a 90° angle
Step 2
Tape the funnel at the tip (opposite of the bend) of the straw
Step 3
Place ping pong ball in funnel and blow through opposite end of straw, demonstrating Bernoulli’s principle.
Real Women in STEM
Resource 1
Phoebe Omlie
Phoebe Omlie was an American aviation pioneer and female aviator. She received the first Transport Pilot’s License and Airplane Mechanic’s License issued to a woman and set many speed, endurance and altitude records.

Rosie Innovators Make Marble Jumping Beans
Marble Jumping Beans: Gravity in Action
Gravity is the force that pulls everything down to Earth—it’s what brings you back when you jump! But what happens when a marble inside a bean starts rolling down a ramp?
As the bean moves down the incline, gravity makes the marble roll inside. When the marble hits the walls of the bean, it causes the bean to flip over, making it look like it’s “jumping” down the ramp!
In this project created by Niittisha, a member of the Rosie Innovators STEM program for young women in high school, you’ll build your own jumping bean to see how gravity and motion work together. Ready to try it? Gather your materials and follow the instructions below!
Required Materials
- marble
- tin foil
- plastic container w/ lid
Step-By-Step Instructions
Step 1
Start with the short side of the foil facing you, and place the marble on top of it.
Step 2
Roll the foil around the marble to create a tube.
Step 3
Pinch and fold the ends of the foil to seal, with the marble still inside.
Step 4
Place the bean inside a plastic container and shake until the edges are rounded and smooth.
Step 5
Take out the bean, place it on an incline, and watch as it jumps down!
Real Women in STEM
Resource 1
Elsie Eaves
Elsie Eaves was a civil engineer who became one of the first female engineers to work on the design of the Hoover Dam. She was the first woman to be elected to the American Society of Civil Engineers, and she served as president of the Society of Women Engineers.